Android 蓝牙源码学习笔记
上文介绍了蓝牙基本原理和潜在的攻击面,但实现部分介绍不多。本文作为补充,以 Android 中的蓝牙协议栈为例,学习并了解在实际系统中蓝牙的工程实现。
术语
在阅读源码的过程中发现许多函数名称带有意义不明的缩写,下面是笔者整理的一些缩写及其对应含义:
- BTIF: Bluetooth Interface
- BTU : Bluetooth Upper Layer
- BTM: Bluetooth Manager
- BTE: Bluetooth embedded system
- BTA :Blueetooth application layer
- CO: call out
- CI: call in
- HF : Handsfree Profile
- HH: HID Host Profile
- HL: Health Device Profile
- av: audio/vidio
- ag: audio gateway
- ar: audio/video registration
- gattc: GATT client
Android Bluetooth Stack
安卓中蓝牙协议栈主要分为三个时期,上古时期使用的是BlueZ,后来在4.2之后自己独立出来称为BlueDroid,现在好像又改名叫Fluoride了。BlueZ时期和PC上的结构差不多,但是安卓上不使用DBus IPC,因此需要将这部分代码去除,其他部分可参考BlueZ的介绍。
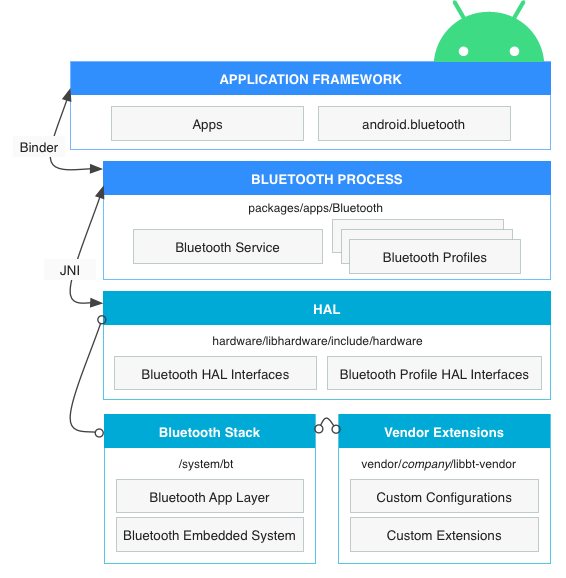
7.0
在Android<=7.0时期,蓝牙协议栈的实现架构如下:
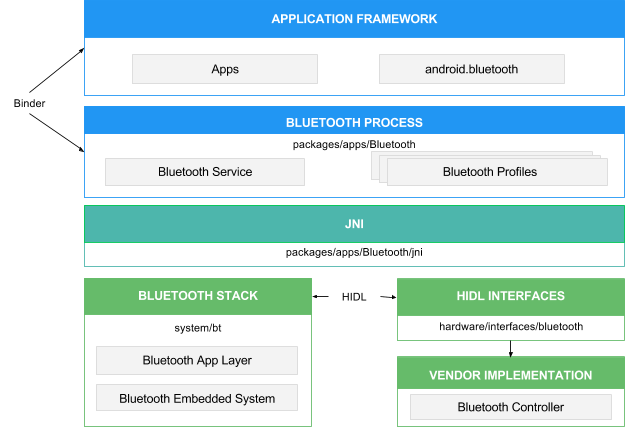
8.0
Android 8.0 以后对蓝牙协议栈进行了重构,主要优化是使用HIDL来取代之前的硬件抽象层,方便厂商的接口集成:
实现分析
Android蓝牙协议栈的实现在system/bt目录中,本节记录下其代码分析的过程,使用的是 Android 10 分支(ae35d7765)。
首先,该目录下包含1000+文件,有点无从入手。一般遇到这种情况我们都是从具体的入口函数出发,比如main函数,但这里并不是一个单纯的客户端程序。蓝牙协议栈一方面是以系统服务的方式提供接口,另一方面也以client的方式给应用程序提供SDK,不管怎样,最终都是需要经过HCI协议去与Controller进行交互。
对于BlueZ而言,蓝牙协议栈部分在内核中实现,socket系统调用提供了AF_BLUETOOTH的 family,可以支持获取HCI、L2CAP、RFCOMM类型的socket;但对于BlueDroid而言,协议栈是在用户层实现的,内核只暴露出HCI(USB/UART)的接口。因此,我们可以从HCI出发,自底向上进行分析,也可以参考上面的框架图,从用户应用程序开始,自顶向下进行分析。
用户层
首先从用户接口出发,参考Android的开发者文档是如何发现设备以及创建蓝牙连接的:
- https://developer.android.com/guide/topics/connectivity/bluetooth
- https://developer.android.com/guide/topics/connectivity/bluetooth-le
以BR/EDR为例,其中需要注意的是paired和connected的区别:
- paired 表示两个设备知道彼此的存在,并且已经协商好了链路秘钥(Link Key),可用该秘钥来进行认证和创建加密链接
- connected 表示两个已经配对的设备创建了一个RFCOMM链接,共享一个RFCOMM channel
Android使用蓝牙接口的流程大致如下:
// 获取本地适配器
BluetoothAdapter bluetoothAdapter = BluetoothAdapter.getDefaultAdapter();
// 开启蓝牙,需要权限
if (!bluetoothAdapter.isEnabled()) {
    Intent enableBtIntent = new Intent(BluetoothAdapter.ACTION_REQUEST_ENABLE);
    startActivityForResult(enableBtIntent, REQUEST_ENABLE_BT);
}
// Discover、Pair、Connect
以设置本机蓝牙可被发现(300秒)为例,应用层代码为:
Intent discoverableIntent =
        new Intent(BluetoothAdapter.ACTION_REQUEST_DISCOVERABLE);
discoverableIntent.putExtra(BluetoothAdapter.EXTRA_DISCOVERABLE_DURATION, 300);
startActivity(discoverableIntent);
Settings Activity (Binder Client)
根据intents-filters的介绍,我们知道这是由于其他App去处理的请求,即com.android.settings/.bluetooth.RequestPermissionActivity,该页面调用弹窗询问(startActivityForResult)用户是否允许本设备被发现,并且在回调(onActivityResult)中注册蓝牙的回调中调用:
mBluetoothAdapter.setScanMode(
  BluetoothAdapter.SCAN_MODE_CONNECTABLE_DISCOVERABLE, mTimeout);
frameworks/base/core/java/android/bluetooth/BluetoothAdapter.java
@UnsupportedAppUsage
public boolean setScanMode(@ScanMode int mode, int duration) {
    if (getState() != STATE_ON) {
        return false;
    }
    try {
        mServiceLock.readLock().lock();
        if (mService != null) {
            return mService.setScanMode(mode, duration);
        }
    } catch (RemoteException e) {
        Log.e(TAG, "", e);
    } finally {
        mServiceLock.readLock().unlock();
    }
    return false;
}
题外话: 上面的annotation表示该接口不是SDK的一部分,在9.0之前APP是可以通过反射进行调用的,9.0之后安卓更新了限制方法,不过也有其他的绕过方式,见: https://stackoverflow.com/questions/55970137/bypass-androids-hidden-api-restrictions
其中mService是IBluetooth类型,直指蓝牙服务system/bt/binder/android/bluetooth/IBluetooth.aidl,值得一提的是,该目录下还包含了数十个AIDL文件,用于描述进程所提供的服务。
AIDL Server
该AIDL的实现在packages/apps/Bluetooth/src/com/android/bluetooth/btservice/AdapterService.java,该Server的JNI实现在packages/apps/Bluetooth/jni/com_android_bluetooth_btservice_AdapterService.cpp,内部主要使用sBluetoothInterface接口来实现功能,该接口的定义为:
static const bt_interface_t* sBluetoothInterface该接口的实现在btif/src/bluetooth.cc中。
回到SetScanMode,其实现在system/bt/service/adapter.cc:
bool SetScanMode(int scan_mode) override {
  switch (scan_mode) {
    case BT_SCAN_MODE_NONE:
    case BT_SCAN_MODE_CONNECTABLE:
    case BT_SCAN_MODE_CONNECTABLE_DISCOVERABLE:
      break;
    default:
      LOG(ERROR) << "Unknown scan mode: " << scan_mode;
      return false;
  }

  auto bd_scanmode = static_cast<bt_scan_mode_t>(scan_mode);

  if (!SetAdapterProperty(BT_PROPERTY_ADAPTER_SCAN_MODE, &bd_scanmode,
                          sizeof(bd_scanmode))) {
    LOG(ERROR) << "Failed to set scan mode to : " << scan_mode;
    return false;
  }

  return true;
}核心是SetAdapterProperty:
// Sends a request to set the given HAL adapter property type and value.
bool SetAdapterProperty(bt_property_type_t type, void* value, int length) {
  CHECK(length > 0);
  CHECK(value);

  bt_property_t property;
  property.len = length;
  property.val = value;
  property.type = type;

  int status =
      hal::BluetoothInterface::Get()->GetHALInterface()->set_adapter_property(
          &property);
  if (status != BT_STATUS_SUCCESS) {
    VLOG(1) << "Failed to set property";
    return false;
  }

  return true;
}其中GetHALInterface是蓝牙的核心接口bt_interface_t,定义在接口子系统中system/bt/btif/src/bluetooth.cc,随后依次调用:
- set_adapter_property
- btif_set_adapter_property (btif/src/btif_core.c)
- BTA_DmSetVisibility (bta/dm/bta_dm_api.cc)
  /** This function sets the Bluetooth connectable, discoverable, pairable and
   * conn paired only modes of local device
   */
void BTA_DmSetVisibility(tBTA_DM_DISC disc_mode, tBTA_DM_CONN conn_mode,
                           uint8_t pairable_mode, uint8_t conn_paired_only) {
    do_in_main_thread(FROM_HERE,
                      base::Bind(bta_dm_set_visibility, disc_mode, conn_mode,
                                 pairable_mode, conn_paired_only));
}do_in_main_thread是将任务push到对应的线程任务池中执行,所执行的函数是bta_dm_set_visibility(bta/dm/bta_dm_act.cc),主要功能是根据参数的逻辑分别设置对应的属性:
- BTM_SetDiscoverability
- BTM_SetConnectability
- BTM_SetPairableMode
stack/btm/btm_inq.cc
  /*******************************************************************************
   *
   * Function         BTM_SetDiscoverability
   *
   * Description      This function is called to set the device into or out of
   *                  discoverable mode. Discoverable mode means inquiry
   *                  scans are enabled.  If a value of '0' is entered for window
   *                  or interval, the default values are used.
   *
   * Returns          BTM_SUCCESS if successful
   *                  BTM_BUSY if a setting of the filter is already in progress
   *                  BTM_NO_RESOURCES if couldn't get a memory pool buffer
   *                  BTM_ILLEGAL_VALUE if a bad parameter was detected
   *                  BTM_WRONG_MODE if the device is not up.
   *
   ******************************************************************************/
tBTM_STATUS BTM_SetDiscoverability(uint16_t inq_mode, uint16_t window,
                                     uint16_t interval) {
      BTM_TRACE_API("BTM_SetDiscoverability");
    if (controller_get_interface()->supports_ble()) {
      if (btm_ble_set_discoverability((uint16_t)(inq_mode)) == BTM_SUCCESS) {
        btm_cb.btm_inq_vars.discoverable_mode &= (~BTM_BLE_DISCOVERABLE_MASK);
        btm_cb.btm_inq_vars.discoverable_mode |=
            (inq_mode & BTM_BLE_DISCOVERABLE_MASK);
      }
    }

    inq_mode &= ~BTM_BLE_DISCOVERABLE_MASK;

    /*** Check mode parameter ***/
    if (inq_mode > BTM_MAX_DISCOVERABLE) return (BTM_ILLEGAL_VALUE);

    /* Make sure the controller is active */
    if (!controller_get_interface()->get_is_ready()) return (BTM_DEV_RESET);

    /* If the window and/or interval is '0', set to default values */
    if (!window) window = BTM_DEFAULT_DISC_WINDOW;

    if (!interval) interval = BTM_DEFAULT_DISC_INTERVAL;

    BTM_TRACE_API(
        "BTM_SetDiscoverability: mode %d [NonDisc-0, Lim-1, Gen-2], window "
        "0x%04x, interval 0x%04x",
        inq_mode, window, interval);

      /*** Check for valid window and interval parameters ***/
      /*** Only check window and duration if mode is connectable ***/
	  // ...

      /* Set the IAC if needed */
    if (inq_mode != BTM_NON_DISCOVERABLE) {
      if (inq_mode & BTM_LIMITED_DISCOVERABLE) {
        /* Use the GIAC and LIAC codes for limited discoverable mode */
        memcpy(temp_lap[0], limited_inq_lap, LAP_LEN);
        memcpy(temp_lap[1], general_inq_lap, LAP_LEN);

        btsnd_hcic_write_cur_iac_lap(2, (LAP * const)temp_lap);
      } else {
        btsnd_hcic_write_cur_iac_lap(1, (LAP * const) & general_inq_lap);
      }

      scan_mode |= HCI_INQUIRY_SCAN_ENABLED;
    }

    /* Send down the inquiry scan window and period if changed */
    if ((window != btm_cb.btm_inq_vars.inq_scan_window) ||
        (interval != btm_cb.btm_inq_vars.inq_scan_period)) {
      btsnd_hcic_write_inqscan_cfg(interval, window);
      btm_cb.btm_inq_vars.inq_scan_window = window;
      btm_cb.btm_inq_vars.inq_scan_period = interval;
    }

    if (btm_cb.btm_inq_vars.connectable_mode & BTM_CONNECTABLE_MASK)
      scan_mode |= HCI_PAGE_SCAN_ENABLED;

    btsnd_hcic_write_scan_enable(scan_mode);
    btm_cb.btm_inq_vars.discoverable_mode &= (~BTM_DISCOVERABLE_MASK);
    btm_cb.btm_inq_vars.discoverable_mode |= inq_mode;

    /* Change the service class bit if mode has changed */
    // ...
      return (BTM_SUCCESS);
  }
这其中涉及了几个API:
- btm_ble_set_discoverability
- btsnd_hcic_write_cur_iac_lap
- btsnd_hcic_write_inqscan_cfg
- btsnd_hcic_write_scan_enable
第一个API是BLE相关,内部实际上最终也调用了btsnd_hcic_xxx的类似接口。IAC意为Inquiry Access Code,蓝牙baseband定义了几个固定IAC,分别是LIAC和GIAC(见baseband)。LAP是蓝牙地址的一部分,如下图所示:

- NAP: Non-significant Address Part, NAP的值在跳频同步帧中会用到
- UAP: Upper Address Part,UAP的值会参与对蓝牙协议算法的选择
- LAP: Lower Address Part,由设备厂商分配,LAP的值作为Access Code的一部分,唯一确定某个蓝牙设备
- SAP (significant address part) = UAP + LAP
让我们继续回到代码中,以btsnd_hcic_write_cur_iac_lap为例,其实现如下:
// stack/hcic/hcicmds.cc
void btsnd_hcic_write_cur_iac_lap(uint8_t num_cur_iac, LAP* const iac_lap) {
    BT_HDR* p = (BT_HDR*)osi_malloc(HCI_CMD_BUF_SIZE);
    uint8_t* pp = (uint8_t*)(p + 1);

    p->len = HCIC_PREAMBLE_SIZE + 1 + (LAP_LEN * num_cur_iac);
    p->offset = 0;

    UINT16_TO_STREAM(pp, HCI_WRITE_CURRENT_IAC_LAP);
    UINT8_TO_STREAM(pp, p->len - HCIC_PREAMBLE_SIZE);

    UINT8_TO_STREAM(pp, num_cur_iac);

    for (int i = 0; i < num_cur_iac; i++) LAP_TO_STREAM(pp, iac_lap[i]);

    btu_hcif_send_cmd(LOCAL_BR_EDR_CONTROLLER_ID, p);
}
UINTx_TO_STREAM(pp, n)的作用是将整数以小端的形式写入p->data中,最终调用btu_hcif_send_cmd函数发送数据(stack/btu/btu_hcif.cc):
/*******************************************************************************
*
* Function         btu_hcif_send_cmd
*
* Description      This function is called to send commands to the Host
*                  Controller.
*
* Returns          void
*
******************************************************************************/
void btu_hcif_send_cmd(UNUSED_ATTR uint8_t controller_id, BT_HDR* p_buf) {
    if (!p_buf) return;

    uint16_t opcode;
    uint8_t* stream = p_buf->data + p_buf->offset;
    void* vsc_callback = NULL;

    STREAM_TO_UINT16(opcode, stream);

    // Eww...horrible hackery here
    /* If command was a VSC, then extract command_complete callback */
    if ((opcode & HCI_GRP_VENDOR_SPECIFIC) == HCI_GRP_VENDOR_SPECIFIC ||
        (opcode == HCI_BLE_RAND) || (opcode == HCI_BLE_ENCRYPT)) {
      vsc_callback = *((void**)(p_buf + 1));
    }

    // Skip parameter length before logging
    stream++;
    btu_hcif_log_command_metrics(opcode, stream,
                                 android::bluetooth::hci::STATUS_UNKNOWN, false);

    hci_layer_get_interface()->transmit_command(
        p_buf, btu_hcif_command_complete_evt, btu_hcif_command_status_evt,
        vsc_callback);
}可见p_buf->data中保存的就是HCI数据,前16位为opcode,其中高6字节为ogf,低10字节为ocf,也就是我们平时使用hcitool cmd时的前两个参数。
HCI 子系统
继续跟踪transmit_command,就来到了HCI子系统中(hci/src/hci_layer.cc):
static void transmit_command(BT_HDR* command,
                           command_complete_cb complete_callback,
                           command_status_cb status_callback, void* context) {
    waiting_command_t* wait_entry = reinterpret_cast<waiting_command_t*>(
        osi_calloc(sizeof(waiting_command_t)));

    uint8_t* stream = command->data + command->offset;
    STREAM_TO_UINT16(wait_entry->opcode, stream);
    wait_entry->complete_callback = complete_callback;
    wait_entry->status_callback = status_callback;
    wait_entry->command = command;
    wait_entry->context = context;

    // Store the command message type in the event field
    // in case the upper layer didn't already
    command->event = MSG_STACK_TO_HC_HCI_CMD;

    enqueue_command(wait_entry);
}enqueue_command如其名字所述,就是将待执行的HCI命令放到队列command_queue的末尾中。那么这个任务队列在哪消费呢?简单搜索可以发现:
// Event/packet receiving functions
void process_command_credits(int credits) {
    std::lock_guard<std::mutex> command_credits_lock(command_credits_mutex);

    if (!hci_thread.IsRunning()) {
      // HCI Layer was shut down or not running
      return;
    }

    // Subtract commands in flight.
    command_credits = credits - get_num_waiting_commands();

    while (command_credits > 0 && !command_queue.empty()) {
      if (!hci_thread.DoInThread(FROM_HERE, std::move(command_queue.front()))) {
        LOG(ERROR) << __func__ << ": failed to enqueue command";
      }
      command_queue.pop();
      command_credits--;
    }
}
其调用链路为:
- BluetoothHciCallbacks::hciEventReceived (hci/src/hci_layer_android.cc)
- hci_event_received
- filter_incoming_event
- process_command_credits
接收数据
BluetoothHciCallbacks::hciEventReceived这个函数回调是在HCI初始化的时候调用的BluetoothHci::initialize(vendor_libs/linux/interface/bluetooth_hci.cc):
Return<void> BluetoothHci::initialize(
  const ::android::sp<IBluetoothHciCallbacks>& cb) {
    ALOGI("BluetoothHci::initialize()");
    if (cb == nullptr) {
      ALOGE("cb == nullptr! -> Unable to call initializationComplete(ERR)");
      return Void();
    }

    death_recipient_->setHasDied(false);
    cb->linkToDeath(death_recipient_, 0);
    int hci_fd = openBtHci();
    auto hidl_status = cb->initializationComplete(
            hci_fd > 0 ? Status::SUCCESS : Status::INITIALIZATION_ERROR);
    if (!hidl_status.isOk()) {
        ALOGE("VendorInterface -> Unable to call initializationComplete(ERR)");
    }
    hci::H4Protocol* h4_hci = new hci::H4Protocol(
        hci_fd,
        [cb](const hidl_vec<uint8_t>& packet) { cb->hciEventReceived(packet); },
        [cb](const hidl_vec<uint8_t>& packet) { cb->aclDataReceived(packet); },
        [cb](const hidl_vec<uint8_t>& packet) { cb->scoDataReceived(packet); });

    fd_watcher_.WatchFdForNonBlockingReads(
            hci_fd, [h4_hci](int fd) { h4_hci->OnDataReady(fd); });
    hci_handle_ = h4_hci;

    unlink_cb_ = [cb](sp<BluetoothDeathRecipient>& death_recipient) {
      if (death_recipient->getHasDied())
        ALOGI("Skipping unlink call, service died.");
      else
        cb->unlinkToDeath(death_recipient);
    };

    return Void();
}fd_watcher_本质上是针对hci_fd文件句柄的读端事件监控,后者由openBtHci函数产生,该函数由厂商实现,接口文件是hardware/interfaces/bluetooth/1.0/IBluetoothHci.hal。在Linux中的参考实现如下:
// system/bt/vendor_libs/linux/interface/bluetooth_hci.cc
int BluetoothHci::openBtHci() {
    ALOGI( "%s", __func__);

    int hci_interface = 0;
    rfkill_state_ = NULL;
    rfKill(1);

    int fd = socket(AF_BLUETOOTH, SOCK_RAW, BTPROTO_HCI);
    if (fd < 0) {
    ALOGE( "Bluetooth socket error: %s", strerror(errno));
      return -1;
    }
    bt_soc_fd_ = fd;

    if (waitHciDev(hci_interface)) {
    ALOGE( "HCI interface (%d) not found", hci_interface);
      ::close(fd);
      return -1;
    }
    struct sockaddr_hci addr;
    memset(&addr, 0, sizeof(addr));
    addr.hci_family = AF_BLUETOOTH;
    addr.hci_dev = hci_interface;
    addr.hci_channel = HCI_CHANNEL_USER;
    if (bind(fd, (struct sockaddr*)&addr, sizeof(addr)) < 0) {
    ALOGE( "HCI Channel Control: %s", strerror(errno));
      ::close(fd);
      return -1;
    }
    ALOGI( "HCI device ready");
    return fd;
}
发送数据
继续回头接着上节之前的内容讲,我们的任务队列是在process_command_credits中被消费的,取出来之后需要进入到hci_thread线程中执行。从接收数据一节中也能看出,hci接口本身使用的是串行总线,因此不能并发地发送数据,所有命令都是在之前的命令响应后再发送。
值得一提的是,enqueue_command实际上绑定的是函数event_command_ready,以包含我们命令内容和对应回调的类型waiting_command_t为参数:
static void enqueue_command(waiting_command_t* wait_entry) {
	base::Closure callback = base::Bind(&event_command_ready, wait_entry);
    //...
	command_queue.push(std::move(callback));
}
因此,负责执行HCI发送命令的是event_command_ready函数:
  static void event_command_ready(waiting_command_t* wait_entry) {
    {
      /// Move it to the list of commands awaiting response
      std::lock_guard<std::recursive_timed_mutex> lock(
          commands_pending_response_mutex);
      wait_entry->timestamp = std::chrono::steady_clock::now();
      list_append(commands_pending_response, wait_entry);
    }
    // Send it off
    packet_fragmenter->fragment_and_dispatch(wait_entry->command);

    update_command_response_timer();
  }
首先将command放到一个等待响应的队列里,然后分片发送:
static void fragment_and_dispatch(BT_HDR* packet) {
    CHECK(packet != NULL);

    uint16_t event = packet->event & MSG_EVT_MASK;
    uint8_t* stream = packet->data + packet->offset;

    // We only fragment ACL packets
    if (event != MSG_STACK_TO_HC_HCI_ACL) {
      callbacks->fragmented(packet, true);
      return;
    }
    // ACL/L2CAP fragment...
}实现中只对ACL类型的HCI数据进行分片发送,不管是不是分片,都对最后一个packet调用callbacks->fragmented(),callbacks的类型是packet_fragmenter_callbacks_t,在packet_fragmenter_t->init中初始化并设置。而packet_fragmenter的初始化发生在hci_module_start_up()中,HCI层定义的回调如下:
static const packet_fragmenter_callbacks_t packet_fragmenter_callbacks = {
  transmit_fragment, dispatch_reassembled, fragmenter_transmit_finished
};
fragmented即对应transmit_fragment,对应定义如下:
// Callback for the fragmenter to send a fragment
static void transmit_fragment(BT_HDR* packet, bool send_transmit_finished) {
    btsnoop->capture(packet, false);

    // HCI command packets are freed on a different thread when the matching
    // event is received. Check packet->event before sending to avoid a race.
    bool free_after_transmit =
        (packet->event & MSG_EVT_MASK) != MSG_STACK_TO_HC_HCI_CMD &&
        send_transmit_finished;

    hci_transmit(packet);

    if (free_after_transmit) {
      buffer_allocator->free(packet);
    }
}hci_transmit有不同平台的实现,分别在:
- hci/src/hci_layer_linux.c
- hci/src/hci_layer_android.c
前者是通过write直接向HCI socket的fd写入,后者是调用IBluetoothHci::sendHciCommand去实现,接口定义同样是在hardware/interfaces/bluetooth/1.0/IBluetoothHci.hal文件中。
因为不同手机厂商的SoC中集成蓝牙芯片的接口不同,有的是使用USB连接,有的是使用UART连接,因此需要给安卓提供一个统一的操作接口,这个接口就很适合由HAL(HIDL)来进行抽象。这部分实现通常是使用Linux中已有的UART/USB驱动进行操作,以提高代码的复用性。
小结
本文通过从从用户层的一个蓝牙接口进行跟踪,一直向下分析到HCI的硬件抽象层。在这个过程中,穿插了蓝牙中的各个子模块,比如BTA、BTM、BTU 等,并在某些回调注册的节点中分析了对应的的初始化过程。最后根据初始化以及HCI命令的任务队列实现,我们也得知了接收数据/事件时的运行流程,当然还包括ACL分片/重组的逻辑等。对整个BlueDroid系统形成大致理解,有助于为后续的代码审计和漏洞分析奠定基础。
参考链接
- http://www.bluez.org/
- evolution of bluetooth drivers in Linux kernel
- programing bluetooth
- Bluetooth on modern Linux
- bluedroid
- https://medium.com/@muhamed.riyas/android-bluetooth-architecture-853645eff17f
- https://www.sciencedirect.com/topics/computer-science/bluetooth-stack
- https://link.springer.com/content/pdf/10.1007%2F978-0-387-75462-8_20.pdf
- https://www.cnblogs.com/blogs-of-lxl/p/7010061.html